I am not making jewelry anymore. At least, that is where my thoughts are currently at.
I made jewelry in high school as a hobby and stopped for many years while in college and grad school. I picked it back up again about 10 years ago, and a year after that I discovered polymer. It made sense at the time to combine the two, especially since I am not a fan of knick knacks, aka dust collectors.
It has been a good run, but the stuff I make tends to run on the sculptural side, which more often than not become big, bold statement pieces when you are talking jewelry. As it turns out this is a very limited audience. But, year after year, come craft fair season, I tend to make multiples of items ... and don't sell them. I have drawers filled with previous series of things that just don't go out the door.
With the exception of my octopi which I will keep available in necklace form, I feel pretty confident - and really good - about the decision that I am done.
Done with jewelry that is.
I have done a few commissions on non-jewelry items and I am so pleased with how they came out. Behold my latest:
I just love it. And yes, it is a dust collector, but at least it is also a working box, so it is useful art (not that art needs to be useful! I just prefer my art to have a purpose.)
I have been collecting bottles and tins for years. The time has come to make use of them :)
Monday, December 22, 2014
Saturday, November 29, 2014
Jellies!
I have been hard at work getting ready for the 2014 craft fair season. I have new labels and tags, a new display that I'd like to find time to post a tutorial on since it is easy and cheap! Most importantly, I have a new jellyfish design! I have been working on trying to get to a happy place with a jelly for over 2 years, and I think I am pretty satisfied with these. All of these are headed to the craft sales. If any are left, I'll toss them up on Etsy in a couple weeks.
All are between 4-6 inches long and are hung from choker length silk ribbon. They are kind of bolo style in the way they hang. Whatcha think?
All are between 4-6 inches long and are hung from choker length silk ribbon. They are kind of bolo style in the way they hang. Whatcha think?
.JPG) |
| The group shot! |
%2B-%2BCopy.JPG) |
| This is the one I am keeping all to myself! |
Saturday, July 19, 2014
Not all fish are pretty...
I decided to try my hand at making art dolls and have spent months teaching myself (thank you internet!) how to make faces, and hands and feet and eyeballs. My first attempt went ... ok. I am not happy with it. I like the head. I feel like every other part of it was total fail. I will go back and redo the body and turn it into something I can live with and will post her once I am satisfied.
In the interim though, I really wanted to create a mermaid. I think my fail-feet and body of the first one led to that desire. And so, that is what this post is about - my very first art doll - hooray!
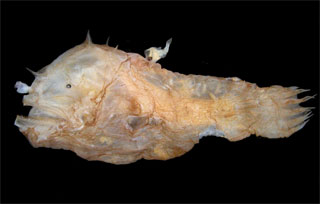
I sort of have a love affair with pretty-ugly things : bats, insects, octopi, those hairless dogs that you see winning the Ugliest Dog Contests all the time to name a few. Enter my love for the ugliest fish I have ever seen: the angler fish. Have you ever seen one of these bad-girls?
They are super fugs and I think they are on of the coolest fish in the sea. I mean, really, just hideous. They live in the deepest part of the ocean, attract prey into their gaping maws by dangling pretty lights in front of them, and the males basically turn into parasitic sperm donors once they latch on.
That little nub in the middle of this one's back is the male. So weird!
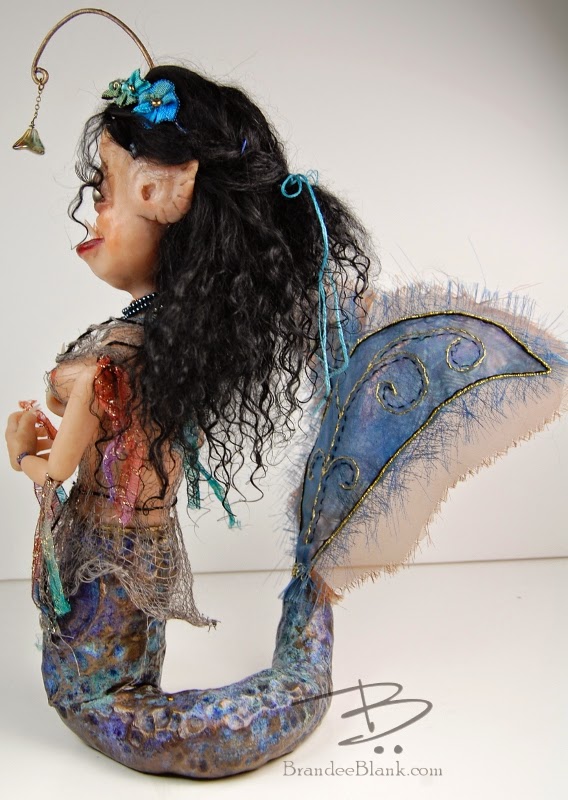
With all that said, behold! My Angler Fish Mermaid! My first completed art doll.
She is about10 inches tall. Polymer clay for the most part, the tailfin is organza sandwiching some angelina film which I then embroidered over. She has mercasite beads for eyes, and beaded necklaces. I made the flowers in her hair from ribbon and glass beads. The hair is Tibetan lambs wool.
I am going to enter her into the latest Christie Friesen Swellegent "contest". I was not sure what I was going to do with the tail until I saw that she had announced it and then I was like - well, duh! That's a perfect application. I used the Bronze metal coat, then the Gold-Green Verdigris patina, and finished up with purple and cerulean dye. I might have used black and white too... I think.
Loads of detail shots follow. Click to embiggen.

Saturday, June 14, 2014
A Tree Man for Father's Day
My pops has been bugging me to make a tree face for his new house. I got off my butt in time for Father's Day to make it happen.
I was able to get quite a bit of depth in it. I hope it looks right on his tree of choice
My other favorite bit is the mustache. I wasn't sure I was going to include it, but I think it makes this face unique. Thumb included for size :)
I was able to get quite a bit of depth in it. I hope it looks right on his tree of choice
One of my favorite things about it is the inclusion of eyebrows. My dad will be able to give him whatever expression he wants. I went for angry tree man for an example:
My other favorite bit is the mustache. I wasn't sure I was going to include it, but I think it makes this face unique. Thumb included for size :)
Saturday, April 12, 2014
Wort Commander Deckbox
My husband is a big Magic the Gathering player and has been bugging me for another deckbox the past couple of months (the first one was the BMO I made him last year). And since I love him and whatnot, I was happy to spend way too long making him one based on his favorite commander deck. The two cards he gave me to work with were Wort, Boggart Auntie, and her house Auntie's Hovel :
And here is what he has ended up with:
I made the box itself from scrap cardboard. I painted over the entire thing (inside and out) with liquid polymer and baked. Then added a thin layer of background clay and baked again before doing the sculpting. The lid went through 4-5 baking cycles. The rest of the box was another 5-6. Inside is lined with felt so as not to damage his precious cards and goblin tokens I made him a while ago.
Loads of detail shots follow!
 |
| Wort by Larry MacDougall. Aunties Hovel by Wayne Reynolds |
I made the box itself from scrap cardboard. I painted over the entire thing (inside and out) with liquid polymer and baked. Then added a thin layer of background clay and baked again before doing the sculpting. The lid went through 4-5 baking cycles. The rest of the box was another 5-6. Inside is lined with felt so as not to damage his precious cards and goblin tokens I made him a while ago.
Loads of detail shots follow!
Sunday, March 23, 2014
A Swellegant Mess...
that was oh so fun to make!
(update: I turned a few of these into necklaces and put them up on my Etsy shop)
A year+ after purchasing the entire Christi Friesen line of Swellegant products, I finally got around to playing with it. What an unbelievably cool surface treatment this stuff is!
There are plenty of how-to's and tutorials out there already for folks to look at, namely the one that CF Originals has available on her site, and a terrific guide put out by Heather Powers of Humblebeads some time back. What I present here are what I learned and what I will do different.
I think that just getting your hands dirty (and if you are like me and don't wear gloves and think your fingers are a paintbrush, they will be an easy accomplishment) and playing with this stuff is the first step, and clearly that is all I have done here. Very little thought went into final product looks. This was mainly because I didn't know what to expect.
If you are a fan of old stuff with rich patinas, and you like surprises, you will have as big of a blast as I did. These are all polymer clay pendants that used several cookie cutters to make the paw-in-heart design.
Here is the full group that I did, with the color combinations I used in the order that I used them:
Like I said, it is a mess :) Click on the images for huge blow up versions to really see the details.
Lesson 1 : don't expect much on a flat surface. I didn't really think about / know how the patinas would be more likely to cling in interesting ways to texture. I did try to build up some texture with the metal coatings itself from a tip in the Humblebeads tutorial. What I was left with was the patinas clinging to obvious brush strokes. In some spots the patina solution didn't hit the surface right and ended up and being entirely absent. The patchy look was not good, but the dyes helped cover it a bit.
Lesson 2 : The least likely beginnings end up looking the coolest (isn't that the way it always is though?) The iron metal coating is a flat grey and really boring when it is plain. It doesn't really look like iron in the same way that the other metal coatings look like the metal they are supposed to look like. That said, I looooove the way that the iron metal coating reacts with the Tiffany/rust patina. Yummmy! I also added blood red and orange dye to really make the rusted feel come through. Side note: the blood red looks like a vial of blood. For real. It is an exact match, enough that I was weirded out for a second.
Lesson 3: Messing up can always be fixed. The first layer of this one was bronze + darkening. With the aforementioned brushstrokes it looked HORRIBLE so I basically started over by adding another solid layer of bronze and starting from scratch.
Lesson 4: White dye is your friend. It doesn't look like much when you put it on, but when it dries, you get that chalky look you see in this one. LERVE. This one is a tie for my favorite with the rust.
Next time around, I will think more along the lines of placement of the dyes and maybe be more aware of where I am adding the patina. I will also be trying out the silver base-coat as I did not have it available for this round of experiments.
So these all will be made into simple necklaces and headed to the craft fair for others dog lovers, like myself. Even though they were practice, I think they came neat enough to offer. I will either keep the rust or the bronze/tiffany one for myself.
Monday, March 17, 2014
The Seattle Aquarium
Hidee Ho!
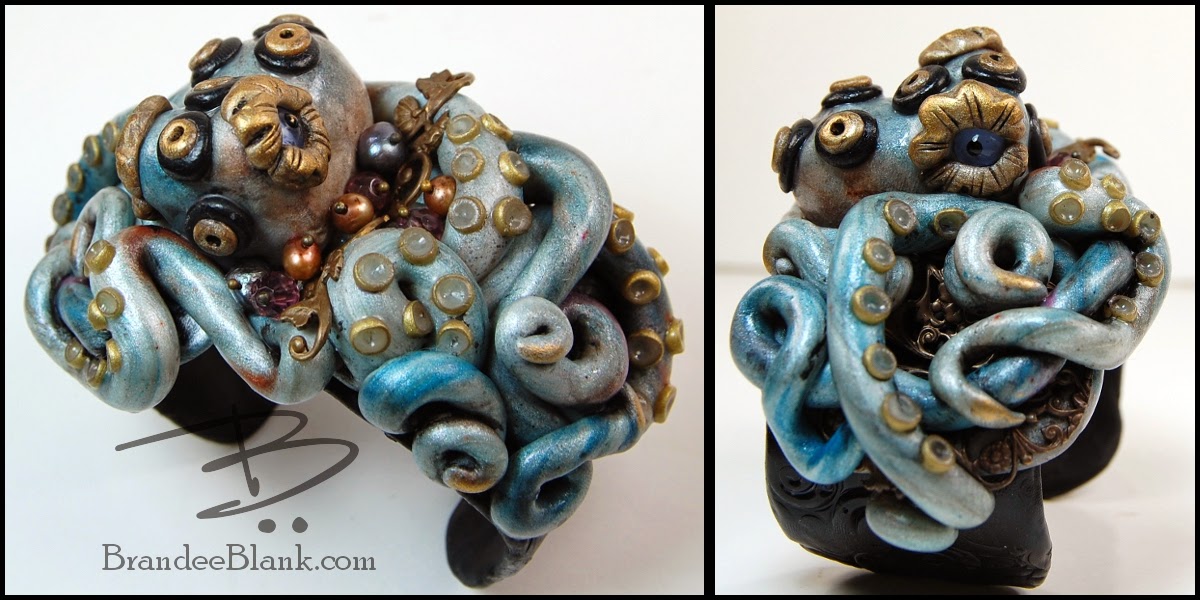
I was contacted by the Seattle Aquarium to donate an octopus piece for their annual fund raiser, Splash. Such a nice compliment! Of course I said I would. And then they came back to me and asked to purchase a second one as a gift for someone. How neat is that!
The patchy purple cuff from my last post is on it's way to the auction while this one:
will be the gift.
While I was working on it, I kind of made three, so my Etsy shop now carries a couple more cuffs:
I'm still working on figuring out how to do a fairy figure. I have made huge progress on faces and heads. I tackled DIY eyes that are polymer but look like glass thanks to the tutorials over at Misty Moon Creations. Soon as I get a finished project to show, I'll also post the many missteps it took to get me there. That should beembarrassing fun.
I was contacted by the Seattle Aquarium to donate an octopus piece for their annual fund raiser, Splash. Such a nice compliment! Of course I said I would. And then they came back to me and asked to purchase a second one as a gift for someone. How neat is that!
The patchy purple cuff from my last post is on it's way to the auction while this one:
will be the gift.
While I was working on it, I kind of made three, so my Etsy shop now carries a couple more cuffs:
I'm still working on figuring out how to do a fairy figure. I have made huge progress on faces and heads. I tackled DIY eyes that are polymer but look like glass thanks to the tutorials over at Misty Moon Creations. Soon as I get a finished project to show, I'll also post the many missteps it took to get me there. That should be
Tuesday, February 11, 2014
Coming out of a slump... I hope
I hit a real slump in January - not feeling creative and quite unproductive. I may have burnt myself out with the craft fair again. It happens every year. I don't know why I am surprised by that.
The other thing was having two fairly crappy things happen. First, I had someone return an octopus they purchased from me. Seriously? Returning art? I have on my Etsy site that I do not take returns, but I'll be damned if I am going to allow someone to keep a piece of my heart and soul when they didn't want it! Still, I'm quite taken aback by the ignorance.
Second, the foray into having my things at a brick and mortar store didn't work out. I had my things in there for two months. I thought nothing sold and I got bummed out and informed the store owner I would pick my items up. When I got there, it turns out that several pieces and a lot of earrings sold. I almost broke even so it wasn't as bad as I thought it was. I am not sure why the owner didn't tell me she sold anything (when I left stuff there she said she would tell me when anything sold) but I took it all anyway.
It's all good - the leftover stuff is up at Etsy. I still have 6 necklaces to add up there that I haven't gotten around to yet.
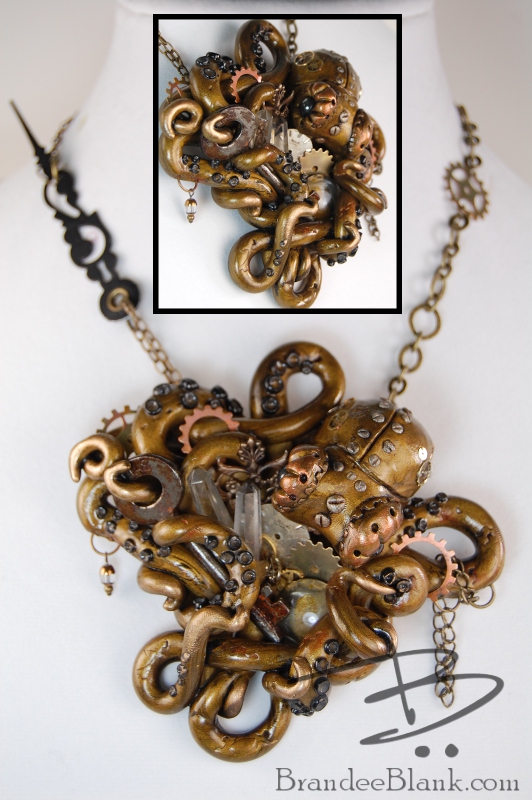
My enthusiasm was a bit rekindled though when I got two neat custom orders back to back just last week. First, a steampunk octopus. I have not done anything steam punk yet (just being stubborn. Long story) but I think it came out adorbs:
Hmm maybe the story wasn't that long after all.
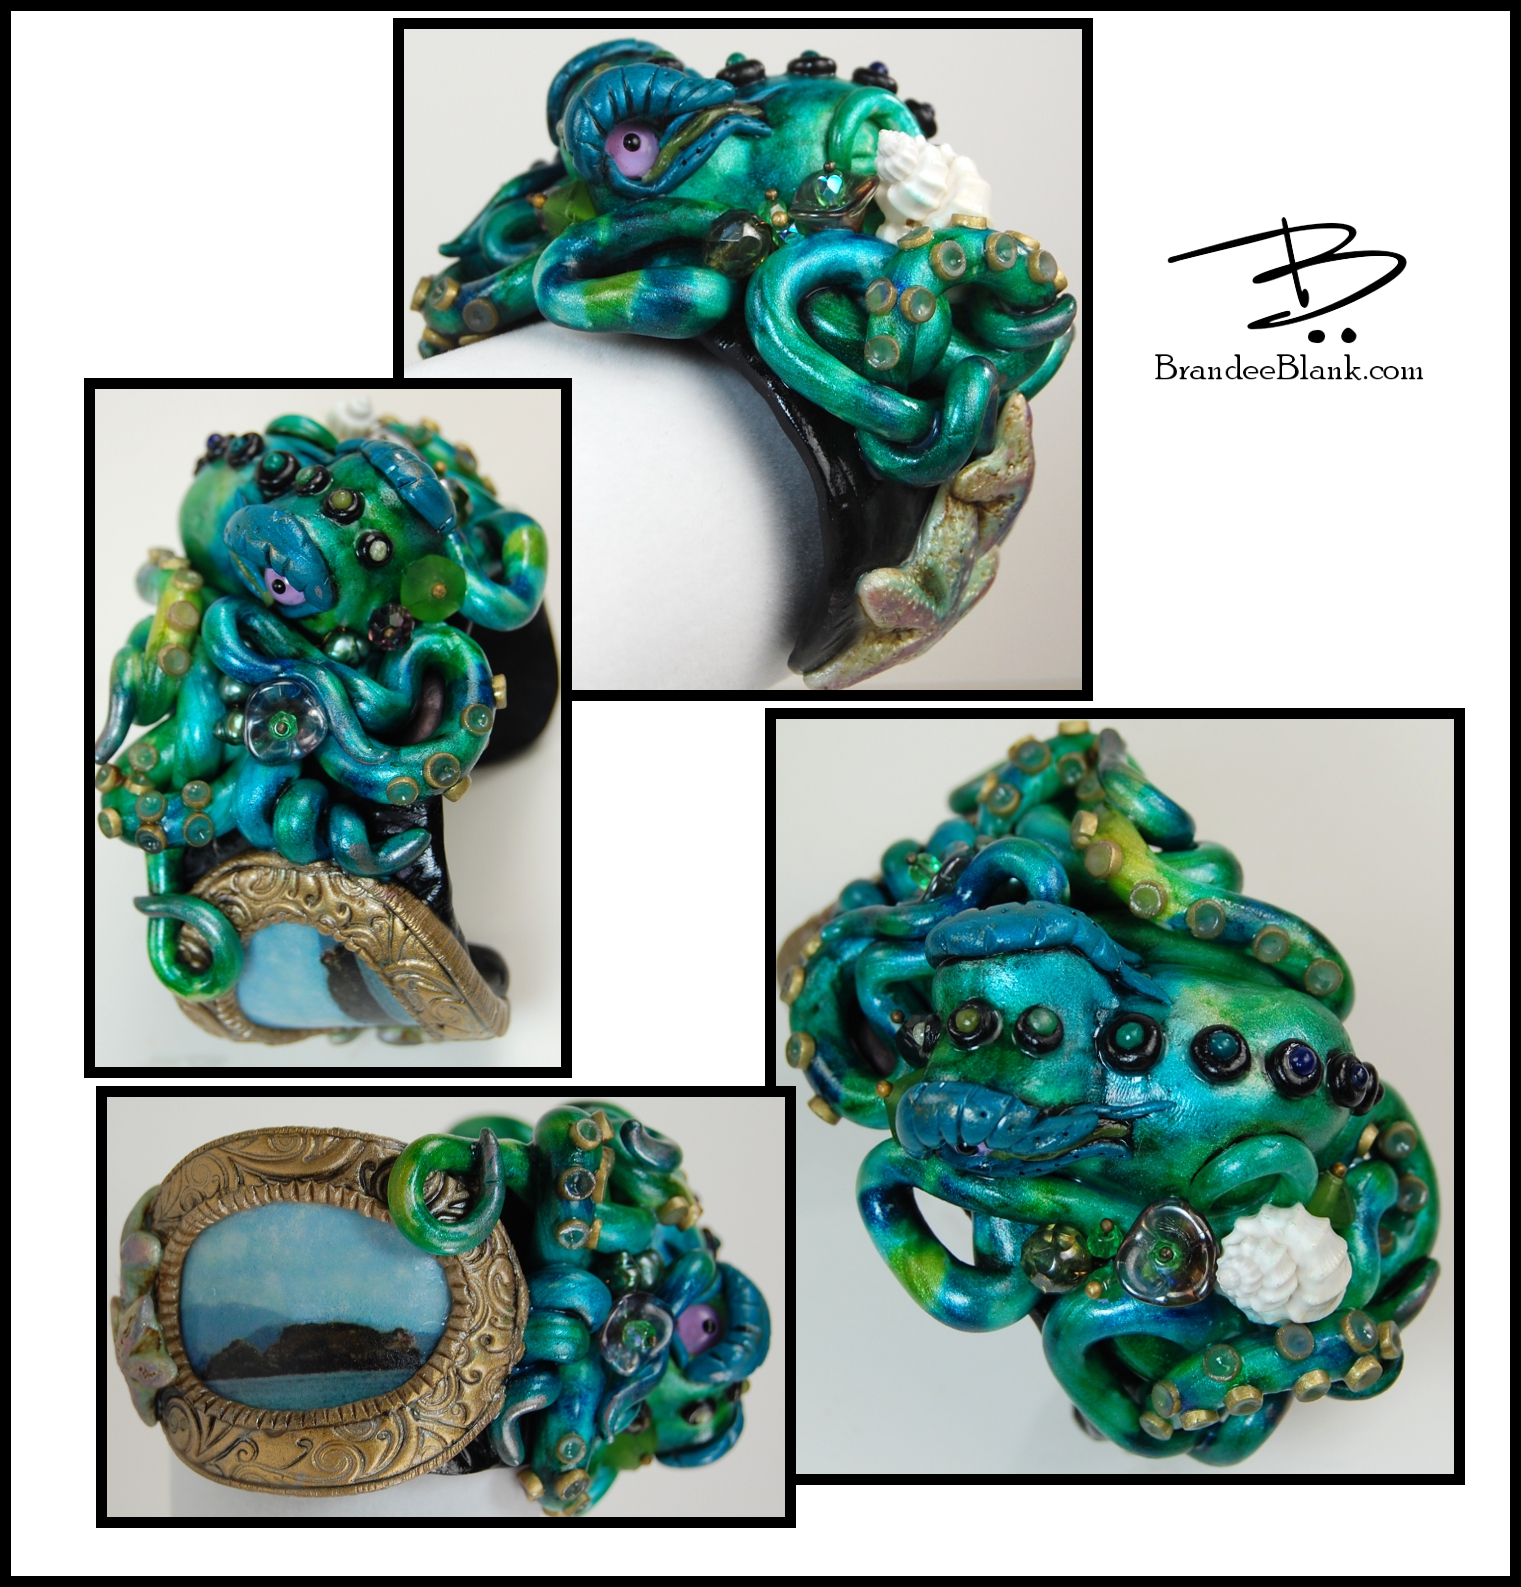
The other interesting piece was a octopus cuff bracelet that is to be a V-day gift from a husband to his wife. They just got back from a trip to Shark Island in VA where they saw an octopus on a scuba dive. He wanted something to commemorate the trip. I ended up doing an image transfer of the island and making it look like a framed photo on the cuff, thusly:
And now, I have 2 more commissions to work on 1) a set of tokens for an MTG deck that has lots of creatures. and 2) a fairy. Yep, I have to see if I can make an art doll. I'm skert! Luckily, the person who has ordered it is an old friend and we have an agreement that if I can't pull it off, it's ok :)
The other thing was having two fairly crappy things happen. First, I had someone return an octopus they purchased from me. Seriously? Returning art? I have on my Etsy site that I do not take returns, but I'll be damned if I am going to allow someone to keep a piece of my heart and soul when they didn't want it! Still, I'm quite taken aback by the ignorance.
Second, the foray into having my things at a brick and mortar store didn't work out. I had my things in there for two months. I thought nothing sold and I got bummed out and informed the store owner I would pick my items up. When I got there, it turns out that several pieces and a lot of earrings sold. I almost broke even so it wasn't as bad as I thought it was. I am not sure why the owner didn't tell me she sold anything (when I left stuff there she said she would tell me when anything sold) but I took it all anyway.
It's all good - the leftover stuff is up at Etsy. I still have 6 necklaces to add up there that I haven't gotten around to yet.
My enthusiasm was a bit rekindled though when I got two neat custom orders back to back just last week. First, a steampunk octopus. I have not done anything steam punk yet (just being stubborn. Long story) but I think it came out adorbs:
Of course, the whole time I was making it, this song was going through my head:
Hmm maybe the story wasn't that long after all.
The other interesting piece was a octopus cuff bracelet that is to be a V-day gift from a husband to his wife. They just got back from a trip to Shark Island in VA where they saw an octopus on a scuba dive. He wanted something to commemorate the trip. I ended up doing an image transfer of the island and making it look like a framed photo on the cuff, thusly:
And now, I have 2 more commissions to work on 1) a set of tokens for an MTG deck that has lots of creatures. and 2) a fairy. Yep, I have to see if I can make an art doll. I'm skert! Luckily, the person who has ordered it is an old friend and we have an agreement that if I can't pull it off, it's ok :)
Subscribe to:
Posts (Atom)


%2B-%2BCopy.JPG)
%2B-%2BCopy.JPG)
%2B-%2BCopy.JPG)
%2B-%2BCopy.JPG)
%2B-%2BCopy.JPG)
.JPG)

